What is duty cycling? Duty cycling refers to the practice of operating the Ultrasonic Personal Air...
Do you want to design a project in which study participants initiate and collect multiple consecutive filter samples using the UPAS? Keep reading to learn about how we designed and implemented such a field campaign with residents of a rural community in California’s Central Valley.
Study design
Researchers from Access Sensor Technologies (AST) and Colorado State University (CSU) worked with the Central California Environmental Justice Network (CCEJN) and community members to collect six back-to-back week-long paired PM2.5 and PM10 samples outside each of three homes in the rural Central Valley.
[6 samples/size fraction] × [2 size fractions/home] × [3 homes] = 36 samples in total
A researcher from CSU set up and started the first pair of samples at each home. At that time, the researcher from CSU and the study participant who lived in the home discussed instructions for collecting the remaining samples. During the weeks that followed, the participant set up and started the remaining five paired PM2.5 and PM10 samples. The participant also removed and stored the used filter cartridges and dirty size-selective inlets after each pair of samples ran to completion. Each participant was compensated for their effort in accordance with a protocol approved by the CSU Institutional Review Board.
Sampling hardware
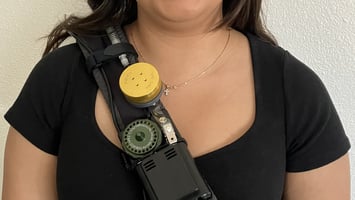
All samples were collected using UPAS v2.1 PLUS that were installed in outdoor enclosures and mounted 5 feet above the ground on tripods. These UPAS v2.1 PLUS were built with special lithium-ion batteries that can charge at temperatures up to 60 °C (the UPAS is typically built with a battery that can charge at temperatures up to 45 °C). A cooling fan was also installed in each outdoor enclosure. Each UPAS was plugged into an outdoor outlet, so no external battery packs or solar panels were used. A sunshade was installed on each outdoor enclosure mounting bracket. PM2.5 samples were collected using our black GEN2P3 PM2.5 1 LPM inlets and PM10 samples were collected using our gold GEN2P3 PM10 2 LPM inlets.
Programming the UPAS
A researcher from AST used the AST UPAS mobile app (for iOS or Android) to program each UPAS to sample for one week at the appropriate flow rate (1 L min-1 for PM2.5 and 2 L min-1 for PM10) and then put the UPAS into “Always Start on Next” (ASON) mode by entering ASON# in the Sample Name field.
In ASON mode, the UPAS will start a new sample automatically, using the most recently-programmed settings, each time it is powered on—without needing to connect to the mobile app for programming. Once the UPAS has completed the pre-programmed sample, it will shut down automatically. In ASON mode, the UPAS can be powered on an indefinite number of times to collect an indefinite number of samples using the same settings. The advantage of using ASON mode in an application like this, in which study participants initiate samples, is that ASON mode reduces the participant’s workload: the participant does not need to install the AST UPAS app on their mobile device or program the settings for each individual sample. There are, however, two limitations associated with ASON operation:
- In ASON mode, there is no way for a unique Sample Name or Cartridge ID for each individual sample to be recorded in the UPAS log file. A separate log of the Cartridge ID associated with each sample will need to be kept by the participant and/or research staff. Keep reading to see how we logged this information during our field campaign.
- In ASON mode, the sample duration timer resets each time the UPAS is powered on. In our case, that meant that if the sample stopped unexpectedly before the one-week duration was complete (for example, because the UPAS got too hot) and was later turned back on by the participant to continue sampling onto the filter designated for that week, the UPAS would sample for a whole week after being turned back on and the sample duration would exceed the desired 168 hours unless the UPAS was manually powered off by the participant at the conclusion of the original one-week period. Keep reading to see how we handled this limitation.
Read more about Always Start On Next (ASON) mode, including instructions for how to put the UPAS into ASON mode, in our UPAS v2.1 and v2.1 PLUS User Guide. Note that Always Start On Next mode is not the same as the “At Next Power On” option listed in the “Start Time” submenu within the mobile app.
Set participants up for success!
We wanted to be respectful of participants’ time and make it as easy as possible for them to collect particulate matter samples. To that end, we provided each participant with the following:
- Two UPAS v2.1 PLUS in Outdoor Enclosures: One UPAS was designated for collecting PM2.5 samples and the other was designated for collecting PM10 samples. On the outside of each enclosure, we affixed a color-coded label (with the color of the corresponding size-selective inlet, either black or gold) that listed the UPAS serial ID and the PM size fraction (PM2.5 or PM10).
- Instruction Sheet and Sample Log: We provided each participant with a one-page instruction sheet and sample log for each UPAS/PM size fraction. In other words, we provided two sheets per household: one for PM2.5 samples and one for PM10 samples. At the top of each sample log, we listed the household ID, the UPAS serial ID, and the PM size fraction that the UPAS was designated to sample (the latter of which was color-coded to match the size-selective inlet). Then, at the bottom of each sample log, we pre-filled the identifier for the cartridge that the participant would install each week. The log also included columns for the participant to list: (a) the date and time when each sample started, (b) the date and time when the sample was expected to end (one week after the start date and time), (c) the date and time when the filter cartridge associated with that sample was removed from the UPAS, and (d) any notes associated with the sample. You can download an example instruction sheet and sample log for PM10 samples here. A screenshot of the example sample log (with fake cartridge IDs) is shown in Figure 1.
 Figure 1. An example sample log with the cartridge ID for each week pre-filled. Participants were asked to record the dates and times when they started each sample, expected each sample to end, and removed each filter from the UPAS.
From the data analyst's perspective, the two most important columns in the sample log are the ones labeled "cartridge" and "sampler turned on." In ASON mode, there is no way to enter the cartridge ID associated with each sample so that it will be listed in the UPAS log file. Instead, the log file lists (a) the UTC date and time when the sample started as well as (b) the lifetime sample count for the UPAS (which increments by one each time a new sample is started). The written log containing the cartridge IDs and the sample start times is required to match each filter sample with the appropriate UPAS log file (and the associated sample start time, sample end time, and sampled air volume).
The "sample expected to end" column served as a reminder to the participant of the date and time when the filter cartridge needed to be removed and a new sample needed to be started. - Filter Cartridges: We provided each participant with two plastic bags containing filter cartridges. One bag contained six filters that were designated for PM2.5 samples; the other contained six filters that were designated for PM10 samples plus one field blank filter. Each filter was pre-loaded into one of our yellow 37-mm filter cartridges and each cartridge was enclosed in a clear plastic clamshell case. Each clear plastic case was labeled with: (a) the serial ID of the UPAS where the participant was supposed to install the filter, (b) the PM size fraction to be collected on the filter (PM2.5 or PM10), (c) the week the filter would be used to sample (1–6; consistent with the week where that cartridge ID was entered in the sample log), (d) the filter cartridge ID. Each of these labels was color-coded to match the size-selective inlet on the corresponding UPAS (black for PM2.5 and gold for PM10; see Figure 2). The case containing the filter designated as the blank was taped shut and labeled “BLANK – Do Not Open – Do Not Sample."
 Figure 2. Each clear plastic clamshell case containing a filter cartridge was labeled with the serial ID of the UPAS the filter should be installed in, the PM size fraction that would be sampled onto the filter, the week when the filter should be used to collect a sample, and the filter cartridge ID.
 - Size-Selective Inlets: We provided each participant with two plastic bags that each contained six size-selective inlets. One bag contained six black PM2.5 1 LPM inlets and the other contained six gold PM10 2 LPM inlets. We typically clean the size-selective inlet after each sample. We provided each participant with a separate, clean inlet for each week-long sample so that participants would not need to clean inlets. We instructed each participant to install a new, clean inlet at the start of each sample.
- Inlet Tool: We provided each participant with a tool for installing and removing UPAS inlets and filter cartridges.
- Gloves: We provided each participant with six pairs of new nitrile gloves. We asked participants to wear these gloves when handling filter cartridges.
- Labeled Storage Bags: We provided each participant with two empty, labeled plastic bags in which they could store used filter cartridges and size-selective inlets. We asked participants to store used filter cartridges in a freezer.
Workflow
At the start of the first week, a researcher from CSU set up and started the first pair of week-long PM2.5 and PM10 samples at each home. The participant was asked to wait until the samplers shut off automatically at the end of the first week-long sample period and then:
- Remove the size-selective inlet and used filter cartridge from each UPAS;
- Place the used “Week 1” cartridges back in their labeled plastic clamshell cases;
- Place the used cartridges and size-selective inlets in the appropriate storage bags;
- Record the date and time when the Week 1 filter cartridges were removed from the UPAS;
- Install a clean size-selective inlet and the filter cartridge labeled “Week 2” on each UPAS;
- Power both UPAS back on (at the same time) so that they would start new week-long samples;
- Record the start date and time for the “Week 2” samples; and
- Place the bag with the used cartridges in a freezer.
The researcher from CSU called the day before the Week 1 sample was due to end to remind each participant that the filter swap-out was coming up and that the participant would need to complete the steps listed above to start the Week 2 sample. The researcher then followed up after the swap-out was due to (a) confirm that the participant was able to complete these steps successfully and (b) respond to any questions or concerns. This process was repeated each week until the field campaign was complete.