How do outdoor particulate matter concentrations measured using Ultrasonic Personal Air Samplers...
Are you new to particulate matter (PM) sampling? Have you purchased sample analysis services through Access Sensor Technologies? Are you looking for advice on how to install sample filters in an Ultrasonic Personal Air Sampler (UPAS) or Home Health Box (HHB)? If so, this post is for you!
The author of this post—Jessica Tryner, our Director of Research—has almost 15 years of experience collecting filter samples of particulate matter air pollution. This post also contains advice from one of our 2024 Energy Institute Cogen Interns—Mattie Morris, an environmental engineering student at Colorado State University—who just learned how to handle filters and collect PM samples this summer!
Keep reading to find:
- Information on what to expect when purchasing sample analysis services through Access Sensor Technologies
- General advice for handling filters and filter cartridges
- Instructions for installing a filter in a cartridge
- Instructions for installing a filter cartridge and size-selective inlet on a UPAS
- What to do after you've collected a sample
- Instructions for shipping used filters back to us for post-sample analysis
What Will I Receive?
When you purchase sample analysis services through Access Sensor Technologies, you will receive pre-weighed, 37-mm diameter polytetrafluoroethylene (PTFE; a.k.a. Teflon™) membrane filters (Measurement Technology Laboratories part number PT37P-PF03). These filters will arrive either (a) bare or (b) already installed in our yellow 37-mm filter cartridges. Either way, each bare filter or pre-loaded filter cartridge will be enclosed in a clear plastic clamshell case to prevent the filter from becoming contaminated with dust, dirt, hair, or fibers when the filter is not installed in a sampler (see Figure 1). Each individual filter will come with an identifier sticker. For each bare filter, the identifier sticker will be on the outside of the clear plastic case. For each filter that is already installed in a cartridge, the identifier sticker will be on the bottom of the cartridge.
General Advice for Handling Filters and Filter Cartridges
- Filters will be weighed to the nearest microgram (10-6 g); therefore, it's very important to avoid getting dust, dirt, hair, or fibers on the filters, filter cartridges, or clear plastic clamshell cases during handling.
- Handle filters and cartridges in a clean area. If working at a table, countertop, or desk, wipe the surface clean with a damp cloth before handling filters and cartridges. Alternatively, cover your work surface with a piece of clean aluminum foil.
- In accordance with general laboratory best practices, never eat, drink, or apply cosmetics while handling filters and cartridges.
- It's best to wear clean nitrile gloves when handling filters and cartridges. If gloves are not available, make sure your hands are clean and dry before handling cartridges.
- Never touch filters with your hands (bare or gloved). Always handle filters using clean tweezers.
- Do not place a filter on any surface besides the inside of (a) the clear plastic clamshell case in which it arrived or (b) a clean filter cartridge.
- While handling filter cartridges, try to keep your fingers away from the holes on the top and bottom surfaces.
- Leave the filter and, if applicable, the cartridge in the clear plastic clamshell case until you are ready to install it in a UPAS or HHB.
Installing a Filter in a Cartridge
NOTICE! If you received filters that are already installed in yellow cartridges, you do not need to separate the cartridge halves or handle the filters directly. See the following section for instructions on how to install a filter cartridge in a UPAS.
The following instructions were adapted from our Size-Selective Inlet User Guide. Please read the entire Size-Selective Inlet User Guide before handling filters and filter cartridges.
- Set up a clean workspace that is free of as much dust as possible. This workspace could be a table that has been wiped clean with a damp cloth or a surface covered with a clean piece of aluminum foil.
- Place the following supplies in your workspace:
-
- Filter (still in the clear plastic clamshell case)
- Filter cartridge
- Tweezers
- Filter cartridge opening tool (optional)
- Nitrile gloves (or similar laboratory gloves)
-
- Separate the upper and lower halves of the filter cartridge using one of the following methods:
- Pry the flanges on the upper and lower halves apart with your fingers.
- Insert the edge of a pair of tweezers into the gap between the top edge of the lip on the lower cartridge half and the bottom edge of the flange on the upper cartridge half. Use the edge of the tweezers to pry the upper and lower cartridge halves apart. Then, grab the flanges on the upper and lower halves and pull them apart to separate the two halves completely.
- Insert the filter cartridge opening tool between the upper and lower flanges; then, twist the cartridge opening tool to pry the upper and lower halves apart (see Figure 2a).
- Confirm that there is a black O-ring installed in the upper cartridge half (see Figure 2b). Make sure this O-ring is fully-seated in its groove and free of damage.
- Open the clear plastic clamshell case that contains the filter. Hold the case carefully while opening it, so that the filter is parallel to the ground, to prevent the filter from falling out onto the work surface, floor, or ground when the case opens. Pry the tabs on the case apart using your gloved fingers.
- Pick up the filter using a clean pair of tweezers. Only grip the filter by the plastic support ring that runs around the outer circumference; never grab the filter by the PTFE membrane (see Figure 2b). Be careful not to poke a hole through the membrane with the tweezers. If there is a hole in the membrane, the filter cannot be used to collect a sample.
- Set the filter in the lower half of the clean filter cartridge, so that it rests on the support pins (see Figure 2c).
- Center the upper half of the cartridge over the lower half and press the two halves back together. Do not drag the upper cartridge half over the filter because this action could rip the filter membrane. Once the upper half of the cartridge has been inserted into the lower half, apply pressure evenly all the way around the upper and lower flanges until the upper half is pressed down firmly against the filter. Make sure the O-ring on the upper half of the cartridge remains seated in its groove during this step. When the cartridge is reassembled, the O-ring in the upper half should no longer be visible above the lip on the lower half.
Watch a demonstration of the steps listed above in this video:
Installing a Filter Cartridge and Inlet on a UPAS
The following instructions were adapted from our UPAS v2.1 and v2.1 PLUS User Guide. Please read the entire user guide before using the UPAS v2.1 or v2.1 PLUS. If you are using a UPAS v2.0, read the UPAS v2.0 User Manual.
 Figure 3: Items needed to install a filter cartridge and size-selective inlet on a UPAS.
- Set up a clean workspace that is free of as much dust as possible. This workspace could be a table that has been wiped clean with a damp cloth or a surface covered with a clean piece of aluminum foil.
- Place the following supplies in your workspace (see Figure 3):
-
- Filter cartridge with filter installed
- Inlet tool or flow check adapter
- The size-selective inlet you will use to collect the sample
- UPAS
- Nitrile gloves (or similar laboratory gloves)
-
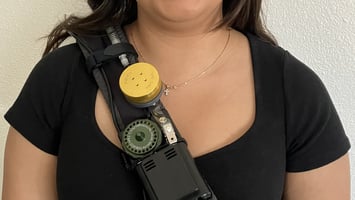
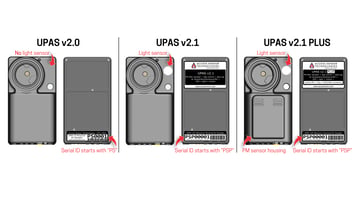
- Lay the UPAS flat on your work surface with the serial ID facing down and the inlet socket facing up (see Figure 4).
- While wearing clean gloves (preferred) or using clean and dry hands, place the filter cartridge in the UPAS inlet socket as shown in Figure 4. Place the top side of the cartridge (the side with one hole) facing up and the bottom side of the cartridge (the side with many small holes plus the QR code) facing down.
- Place the size-selective inlet on top of the filter cartridge so that the stack from bottom to top is the UPAS, the cartridge and, finally, the inlet.
- Place the inlet tool or flow check adapter over the inlet so that the teeth in the tool or flow check adapter fit snugly into the grooves around the circumference of the inlet (see Figure 5). The flow check adapter will need to be pressed down into the grooves on the inlet.
- Turn the tool or flow check adapter clockwise to tighten the inlet until it no longer spins (Figure 5).
- Lift the inlet tool or flow check adapter up off the inlet without loosening the inlet. The flow check adapter might need to be pulled up at an angle and with a bit more force than the inlet tool.
 Figure 4: Place the filter cartridge in the UPAS inlet socket, place the size-selective inlet over the cartridge, and turn the inlet clockwise, using the inlet tool or flow check adapter, to thread the inlet into the socket until it no longer spins.
Once you’ve removed the inlet tool or flow check adapter from the inlet, you’re done installing the filter cartridge and inlet! Examples of UPAS with filter cartridges and inlets installed correctly are shown in Figure 6.
 Figure 6: UPAS that are ready for sampling with filter cartridges and size-selective inlets installed. A UPAS v2.1 PLUS with a PM2.5 2 L min-1 inlet is shown on the left. A UPAS v2.0 with a PM2.5 1 L min-1 inlet is shown on the right.
Watch a demonstration of the steps listed above in this video:
After Sampling
When your sample is complete, remove the filter cartridge from the UPAS or HHB as soon as is practical (i.e., as soon as you can get the sampler to a clean work area). Put the filter or cartridge back in its clear plastic clamshell case immediately after removing it from a UPAS or HHB.
Keep the clear plastic clamshell case clean. If you see any dust, dirt, hair, fibers, or other debris on the case—especially on the inside—wipe the case clean using a lint-free wipe dampened with water before putting the cartridge back inside. Alternatively, you can wash the case with water and a mild detergent (e.g., dish soap) and then let the case dry completely before putting the cartridge back inside.
If you received filters that were already installed in yellow cartridges, you can send the filters back to us in the yellow cartridges. Simply put each cartridge back in a clean, clear plastic clamshell case.
If you received bare filters because you own and clean your own filter cartridges, you will need to remove each filter from its cartridge and put it back in the clear plastic clamshell case that is labeled with the filter's identifier. It's extremely important to put the filter back in the same case, with the same identifier, that the filter was stored in when you received it. The masses of clean filters vary more than the masses of typical PM samples. Your post-sample filter mass data will be meaningless if you put the filter back in the wrong case, with the wrong identifier, after sampling.
Follow these instructions to transfer a filter from a cartridge to the filter's clear plastic clamshell case:
- Set up a clean workspace that is free of as much dust as possible. This workspace could be a table that has been wiped clean with a damp cloth or a surface covered with a clean piece of aluminum foil.
- Place the following supplies in your workspace:
-
- Filter cartridge
- Clear plastic clamshell case (labeled with appropriate filter identifier)
- Tweezers
- Filter cartridge opening tool (optional)
- Nitrile gloves (or similar laboratory gloves)
-
- Open the clear plastic clamshell case the filter by prying the tabs on the case apart using your gloved hands. Set the case down on your work surface so that the inside surface, where the filter will go, is facing up.
- Separate the upper and lower halves of the filter cartridge using one of the following methods:
-
- Pry the flanges on the upper and lower halves apart with your fingers.
- Insert the edge of a pair of tweezers into the gap between the top edge of the lip on the lower cartridge half and the bottom edge of the flange on the upper cartridge half. Use the edge of the tweezers to pry the upper and lower cartridge halves apart. Then, grab the flanges on the upper and lower halves and pull them apart to separate the two halves completely.
- Insert the filter cartridge opening tool between the upper and lower flanges; then, twist the cartridge opening tool to pry the upper and lower halves apart.
-
- Use the clean tweezers to pick the filter up by the plastic support ring that runs around the outer circumference. Never grab the filter by the PTFE membrane. Be careful not to poke a hole through the membrane with the tweezers.
- Place the filter inside it's clamshell case; then, press the case closed using your gloved fingers and without touching the filter.
Filters and cartridges enclosed in clear plastic clamshell cases do not need to be stored in any particular orientation. You can package multiple clear plastic clamshell cases containing used filters and cartridges in a clean plastic bag or wrap them in clean aluminum foil. If you're concerned that part of your sample might volatilize during storage, you can store used filters in a freezer or refrigerator.
Watch a demonstration of the steps listed above in this video:
Returning Used Filters for Post-Sample Analysis
When you're ready to return your used filters for post-sample analysis, ship them to:
Access Sensor Technologies
Attention: Mollie Phillips
320 E Vine Dr., Ste. 221
Fort Collins, CO 80524
Additional Resources
Learn about our filter cartridges, size selective inlets, inlet tool, flow check adapter, and filter cartridge opening tool on our Accessories page. There you will find a link to our Size-Selective Inlet User Guide, which contains additional guidance on cleaning filter cartridges and installing filters in cartridges.
Learn more about our air samplers: the UPAS v2.1, UPAS v2.1 PLUS, and Home Health Box on our product pages. On these pages you will find links to our user guides for these products, which contain additional guidance on installing filter cartridges and size-selective inlets for sampling.
YouTube playlist of videos from this post.
Short video showing how to install a filter in a cartridge:
Short video showing how to remove a filter from a cartridge:
Short video showing how to open a filter cartridge using the filter cartridge opening tool: