Access Sensor Technologies has improved our UPAS v2.1 and UPAS v2.1 PLUS firmware to make UPAS...
In May 2025, we released a major update to our UPAS v2.1 and v2.1 PLUS firmware, named “rev200.” Since then, we’ve continued to improve this firmware incrementally based on our own experiences and customer feedback. Today, we’re releasing another firmware updates for the UPAS v2.1 and v2.1 PLUS named “rev206.” We encourage all users to update their UPAS v2.1 and v2.1 PLUS to rev206.
What's new in UPAS firmware rev206?
Firmware rev206 offers the following improvements over rev200. These changes are discussed in detail in the sections that follow. Click on the linked text in the list below to learn more.
- Expanded microSD card compatibility check: Firmware rev206 performs additional checks to ensure that the UPAS has no difficulty writing to the sample log file on the microSD card and stops sampling if a major write failure occurs .
- Power Save mode bug fix: Firmware rev206 resolves unintended behavior that arose if a UPAS running rev200 was programmed to run in Power Save mode with the GPS turned off.
Expanded microSD card compatibility check
All UPAS firmware versions check on start-up to confirm that a microSD card is installed. Firmware rev206 performs additional checks to confirm that the UPAS is able to write updates to the log file on the microSD card while a sample is running. If the UPAS is unable to write the log file header at the start of a sample, or if the UPAS fails to write two consecutive lines of data to the sample log during a sample, the UPAS will stop the sample, enter an “idle” mode, and the LED will *flash* red. In this event, you will need power off the UPAS, replace the microSD card, then power the UPAS back on and reprogram the sample using the mobile iOS or Android application. If the UPAS is in Always Start On Next (ASON) mode, you will not need to reprogram the UPAS to start a sample with the new microSD card.
If your UPAS is having trouble writing log files, we recommend replacing the microSD card with a new UPAS-compatible microSD card. All new UPAS v2.1 and v2.1 PLUS are shipped with the microSD card shown in Figure 1 installed. If the microSD card included with your new UPAS is lost or damaged, we recommend replacing it with a new microSD card of the same model. If a different model of microSD card is used, the UPAS may have problems writing log files.
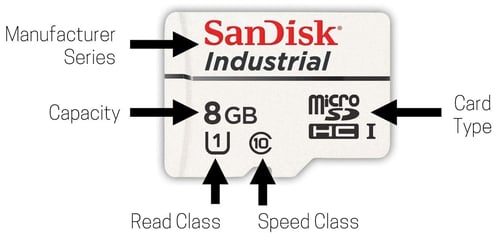
Figure 1. SanDisk Industrial microSD, 8GB SDHC UHS-I Class 10, compatible with and included with the UPAS.
| Specification | Detail |
| Manufacturer | SanDisk |
| Series | Industrial |
| Card type | microSDHC |
| Capacity | 8GB |
| Speed class | 10, 10 Mb/s |
| Read class | UHS read class 1, 10 MB/s |
Power Save mode bug fix
Power Save mode is designed to do the following when the UPAS is running a sample:
- At 9 PM local time:
- The PM sensor operation mode will switch from whichever mode was selected in the PM Sensor Operation submenu when the sample was programmed to “15 Min Interval” and
- The GPS will turn off.
- At 4 AM local time the next morning:
- The PM sensor operation mode will switch back to whichever mode was selected in the PM Sensor Operation submenu when the sample was programmed and
- The GPS will return to whichever setting was selected on the “GPS” line in the MAIN SETTINGS (on or off).
The process described above should repeat on each day of the sample.
Unfortunately, a bug was introduced in firmware rev200 that caused the following undesired behavior: If Power Save mode was on and the GPS was programmed to remain off for the duration of the sample, the UPAS would turn the GPS back on at 4 AM local time during the sample.
This bug is resolved in firmware revisions > 200. Now, if Power Save mode is on and the GPS is programmed to remain off for the duration of the sample (i.e., if the “Off” setting was selected on the “GPS” line in the MAIN SETTINGS), the GPS will remain off for the duration of the sample as intended.
How do I update my UPAS to the new firmware?
Follow the instructions below to install new firmware on your UPAS. Note that the process varies slightly depending on the type of computer used to update the firmware.
-
Determine the firmware version installed on the UPAS using one of these methods:
- Connect the UPAS to the mobile app. The firmware version will be displayed in the "Firmware Revision" field in the Main Menu.
- Open a recent log file recorded by the UPAS. The firmware version will be listed in the first section of the log file header. Find the parameter called "UPASfirmware" and then look at the number that follows "rev_" in the value associated with that parameter.
- Prepare for firmware installation.
- Download the new firmware .bin file to your local computer storage: UPASv2x_STM32Cube_NUCLEO_L476RG_RELEASE_20251009_0717_rev206.bin
- Connect the UPAS to the computer using a USB-A to micro-USB or USB-C to micro-USB cable. If you have difficulty with any of the following steps, try connecting the UPAS to a different USB port on your computer or try using a different USB-A or USB-C to micro-USB adapter/cable, preferably from a reputable brand (e.g., Anker).
- Power-on the UPAS by pressing and holding the pushbutton until the computer recognizes the device "DAPLINK(D)." Then, release the pushbutton.
- Install the new firmware.
- If you have a Microsoft computer or an Apple computer running MacOS v12 or earlier:
- Drag-and-drop or copy-and-paste the firmware file onto the "DAPLINK(D)" device. Approve any permissions and wait approximately 30 seconds for the process to complete.
- The UPAS will disconnect from the computer for a moment and automatically restart.
- If you have a Microsoft computer or an Apple computer running MacOS v12 or earlier:
-
- If you have an Apple computer running MacOS v13 or later:
- Open the mac program called "Terminal."
- Use a text editor to modify this code to include the location of the new firmware binary file:
rsync /Users/ast/Downloads/UPASv2x_STM32Cube_NUCLEO_L476RG_RELEASE_20251009_0717_rev206.bin /Volumes/DAPLINK/ - Copy and paste your code into terminal and press "return."
- Wait for the DAPLINK folder to disappear and then reappear.
- Disconnect the UPAS from the computer.
- Confirm that the new firmware version was installed successfully using one of the methods in Step 1.
- If you have an Apple computer running MacOS v13 or later: